
![]()
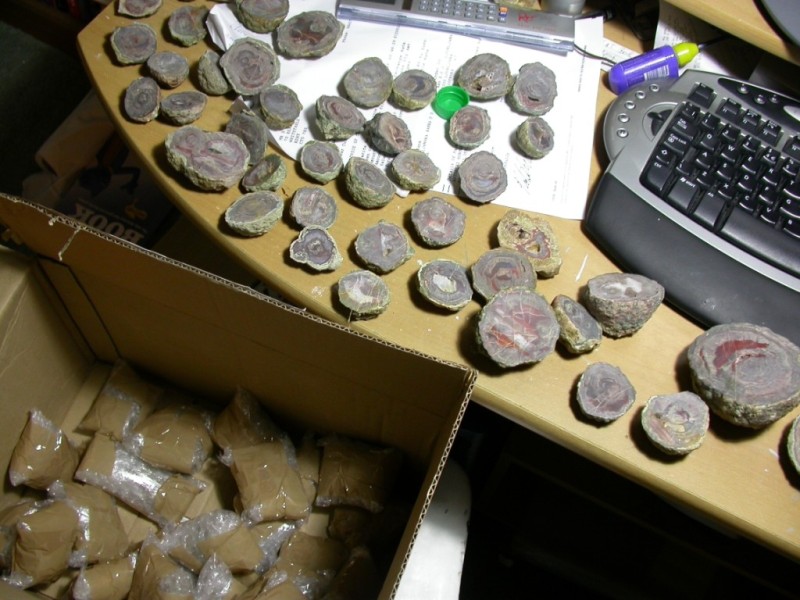
Polishing thundereggs I am no huge expert on polishing thundereggs, so don't expect anything advanced here. Likewise this is not about any particularly advanced technology - just a simple flat lapper. However, there are a few things that I learnt the hard way when I decided to actually take up polishing these stones and I thought I would share them here. This is a page basically aimed at people just starting out. If anyone has anything they want to add to this page then don't hesitate to contact me. Unpolished Thundereggs Before a thunderegg can be polished it must be sawn in half with a diamond rock saw. Thundereggs that have been cut but not polished are quite commonly available on eBay and elsewhere and are often a lot cheaper than the finished articles. You can get a rough idea of what a sawn thunderegg will look like when it is finished by making it wet, which will reveal the patterns and colour up to a point. It must be emphasized though that this is very far from the beauty and detail that you will get in the final polished version. There is a great thrill in watching them take shape and revealing their true character as, when the final stages of polishing is over, you are suddenly aware of new details that just were not visible before. Here's some cut but unpolished Esterel Thundereggs being unpacked. as you can see - they are very dull looking.
Stones must be as flat as possible. If the sawing has been done badly leaving deep grooves or a ridge at the edge it will vastly increase the processing time and occasionally make polishing practically impossible.
Polishing Machine In my case, polishing thundereggs takes place on a vibro-lap machine. Ok - i'd love a professional setup full of belts and pads, but hey! Space dictates! This is a simple device that consists of a flat-bottomed pan (metal and felt and ideally interchangeable) connected to a small motor. The motor causes the plate to vibrate, which makes the stones move around on the surface.
Evans Vibro-Lap with interchangeable pans - a nice basic machine. Having attempted a bit of hand polishing, I can certainly see the advantage of the Vibro-lap machine. It actually takes longer - but at the same time it can do several thundereggs at a time and will usually produce a finer surface. And, best of all, you don't have to spend an entire afternoon listening to classic radio comedy before staggering in again covered from head to toe in white powder . . . Once you have a polishing machine, the consumables are quite cheap. The grits and polish are not particularly expensive. You will occasionally need to get a new felt pad for the pan, but that's about it.
Polishing Grit Bluish Silicon Carbide grit is the classic polishing grit for the first stages of polishing. The process uses progressively fine grades of grit - starting with 80 grit. This is the most important stage. To run the Vibro-lap simply put polishing grit into the metal pan (about three spoonfuls) and add a layer of water (1/8 - 1/4 inch - though I have found that using more seemed to have no ill effect. Place the thundereggs in the pan and switch on. You must be careful not to over-fill the pan so there is room for them to jostle and move comfortably, otherwise they will jam. Also, you will need to top up the water occasionally and also replace the grit if it seems to be degenerating into a non-abrasive brown soup. Light stones may have to be weighted down to help them through these stages. This can be done by making them a kind of cap of plasticine, perhaps incorporating small metal weights. This must be done carefully to avoid it falling off. Another thing that should be considered is putting rubber bands or string round them to act as buffers. this reduces the stress on the stones themselves and also prevents the wearing down their edges, which can happen on Vibrolap machines. This stage will take the longest of all the stages and it is vital to give it the time it needs. This stage must grind away all the irregularities of the surface and leave it completely flat. Any saw marks must be gone and any unevenness must be smoothed out. The end result of this stage should be a perfectly flat uniform dull mat surface. If you don't run the first stage thoroughly enough, the flaws will suddenly become much more apparent later as you polish it up finer and finer - and if that happens, the only thing to do is send the stone through the whole process again. It can sometimes take days to get a really good surface. When you are happy with the first stage, you can wash out the pan and run further sessions, first with 220 grit, then with 400 grit. These stages simply refine the surface and makes it visibly smoother. At the end, it is still matt but very smooth and fine.
Final polishing stage I strongly recommend Tin Oxide for thundereggs. I wasted a lot of time at first because I used the standard Cerium Oxdide stone polish - but that is vastly inferior to the slightly more expensive Tin Oxide. Thundereggs polished with Cerium Oxide can produce nice results on the agate, but can leave a very dull and bland matrix. Tin oxide produces a far finer result, shiny and reflective and mirror-like across the entire surface. Tin Oxide is a fine white powder. For the final polishing stage you need to switch to the felt pad. Add about three good spoonfuls of polish to the pan and a layer of water. This will produce a creamy liquid. Place the thundereggs in there and switch on. You might need to add more powder first time since a lot just soaks straight into the felt. You need to preserve a nice creamy liquid layer, so replenish both water and powder as needed. This stage basically lasts as long as it needs. It can be as quick as eight hours or several days. Check them periodically by washing them, drying them and examining them to see how they are doing (it's important to let the surface dry so you can get an idea of how well it is polished). When they are done, they will be covered with white, so use a scrubbing brush on the rough side and then use a spray gun to blast any last white powder out of geodes, cracks, crevices or pockets. And there you have it. The stone should be finished. Here's a selection of Esterel thundereggs from the batch above:
|


![]()
![]()
Countries:
USA - Canada - Alaska - Mexico - Argentina - Peru - France - Germany - UK - Poland - Greece - Turkey - Romania - Bulgaria - Slovakia - Kazakhstan - Uzbekistan - Russia - Japan - Ethiopia - Iran - Australia - Unknown